


Photo by Andrew Neel on Unsplash
Creating a tutorial blog with code syntax highlighting, dark mode, and copying to clipboard
How to take advantage of Markdown with React and add functionalities to code blocks


Nowadays, there are many websites with which we can create a blog and start writing, but if we want to write technical articles like tutorials, we will need to show code to exemplify the tutorial.
In this case, the same websites offer the option to write code and display it in a different format than the text, for example, here on Hashnode. And how does the site give a different format to this block of text?
Well, in most cases, they use Markdown. Markdown is a markup language that makes it easy to format text, especially using a series of characters.
This tutorial, will learn how to take advantage of Markdown with React.
We will develop the basis of a blog in which we want to share programming tutorials.
We will also add a couple more functionalities to the code blocks that allow us to change the style or theme and copy the code.
What is Markdown?
It’s a markup language that in principle, was designed to produce texts whose destination was going to be the web more quickly and easily than if we were using HTML directly.
In short, it’s a software tool that converts the language into valid HTML.
Let’s say we want to write a level 1 heading. In HTML this is done with the h1 tag. Therefore, we would write:
<h1>Header</h1>
However, using Markdown we would not need to write the tag, but just put a pad at the beginning:
# Header
Here you can find everything about Markdown.
Writing code blocks in Markdown
A commonly used element in Markdown especially for developer blogs is the delimited code block. If we want to display a code block, in our article, we create a delimited code block with a “fence” of backticks before and after the code as follows:
```
var value = 6;
```
What Markdown does is convert that fenced block of code into the following:
<pre><code>var value = 6;</code></pre>
Syntax Highlighting a fenced code block
In Markdown, we can highlight delimited code blocks. This function allows us to add color highlighting for different programming languages.
To add syntax highlighting, we just need to specify the language together with the backticks.
```javascript
var value = 6;
```
Now that we know what Markdown is, let’s see how we can use it inside React. We will create a blog full of tutorials.
Setting Up Our Blog
We create our application with the following command:
npx create-react-app myApp
We install the dependencies that we will need in the project:
npm i markdown-to-jsx react-syntax-highlighter react-copy-to-clipboard
markdown-to-jsx to render markdown files with react.
react-syntax-highlighter to highlight a block of code with a theme.
react-copy-to-clipboard to copy to clipboard the block of code.
After that, we create the following structure for the project:
src/
├── assets/
│   └── icons/
│   └── img/
├── components/
│   └── Code.jsx
│   └── Post.jsx
├── styles/
│   └── App.css
│   └── Code.css
│   └── Post.css
├── tutorials/
│   └── tutorial1.md
├── App.js
└── index.js
To display markdown files with React, we will use a library that converts markdown to JSX called markdown-to-jsx.
With this library, we will be able to work with React components inside markdown files. To do this, let’s follow these steps.
1: Inside the tutorials folder, we create a new .md file, in this case, tutorial1.md, and add the Markdown content we want to display.
To exemplify or simulate a tutorial that we would like to show in our blog, I have taken a part in the React documentation.
# Using the State Hook
The [introduction page](https://reactjs.org/docs/hooks-intro.html) used this example to get familiar with Hooks:
<Code language="javascript">
import React, { useState } from 'react';
function Example() {
// Declare a new state variable, which we'll call "count"
const [count, setCount] = useState(0);
return (
<div>
<p>You clicked {count} times</p>
<button onClick={() => setCount(count + 1)}>
Click me
</button>
</div>
);
}
export default Example;
</Code>
We’ll start learning about Hooks by comparing this code to an equivalent class example.
# Equivalent Class Example
If you used classes in React before, this code should look familiar:
<Code language="javascript">
class Example extends React.Component {
constructor(props) {
super(props);
this.state = {
count: 0
};
}
render() {
return (
<div>
<p>You clicked {this.state.count} times</p>
<button
onClick={() => this.setState({ count: this.state.count + 1 })}>
Click me
</button>
</div>
);
}
}
</Code>
The state starts as `{ count: 0 }`, and we increment state.count when the user clicks a button by calling `this.setState()`. We’ll use snippets from this class throughout the page.
> ***Note***
>
> You might be wondering why we’re using a counter here instead of a more realistic example. This is to help us focus on the API while we’re still making our first steps with Hooks.
In addition, I have replaced the native Markdown code blocks with our <Code/>component.
I mean, instead of writing code inside the inverted quotes that Markdown uses, we write code inside the Code tags. We have called this component this way because in the overrides{} properties of the <Markdown/> component we have assigned that name to it. It can be any name we want.
We will understand this better below.
2: In the components folder we create our <Post/> component and import the markdown-to-jsx package.
3: Setup the state. We configure the state that we will use to store the Markdown content. Initially, we set the postContent variable to a blank string and place it between the <Markdown> tags.
We also have a file name to act as a way to dynamically choose the Markdown file we want.
4: Fetch and display the Markdown file. Once our component is loaded, inside useEffect() we use the import as a function.
The import used in this way acts as a promise and returns the absolute path to our Markdown file.
We then fetch the Markdown file we want using the Fetch API. Once we retrieve the file, we must parse the response as a text file and then store the parsed response in our postContent variable.
5: The <Markdown> component we imported from markdown-to-jsx has a property called options, which in turn has an overrides property that allows us to embed React components into Markdown files by receiving their properties.
In this case, we want to replace the Markdown code blocks with a component that we will create ourselves.
Post.js :
import { useState, useEffect } from "react"
import Markdown from "markdown-to-jsx"
import Code from "./Code"

import cover from '../assets/img/cover.jpeg'
import '../styles/Post.css'

const Post = () => {
  const [postContent, setPostcontent] = useState('')
  const [isDark, setIsDark] = useState(true)

  useEffect(() => {
    import('../tutorials/tutorial1.md')
      .then(res =>
        fetch(res.default)
          .then(response => response.text())
          .then(response => setPostcontent(response))
          .catch(err => console.log(err))
      )
  }, [])

  return (
    <div className="article-wrapper">
      <article>
        <header>
          <div className="article__cover">
            <img
              src={cover}
              alt="my-cover"
            />
          </div>
        </header>
        <main>
          <Markdown
            options={{
              overrides: {
                Code: {
                  component: Code,
                  props: {
                    isDark,
                    setIsDark
                  }
                }
              }
            }}
          >
            {postContent}
          </Markdown>
        </main>
      </article>
    </div>
  )
}

export default Post
Highlighting blocks of code with a theme and copy to the clipboard
We have already seen that Markdown offers code highlighting when we add the type of language we are displaying, but what if we want to give a theme to that block of code as a theme in VS?
For that, we will use react-syntax-highlighter, this library offers code highlighting for a variety of languages, and using Prism, which is another lightweight syntax highlighter, we can access a list of themes or styles for our code.
1: We create another component that we will call <Code/> which will be the one that will show the code blocks. We import Syntax Highlighter, PrismLight, and the style we want, in this case, we select two styles, one for dark mode and another for light mode.
2: Syntax Highlighter asks us to register the languages we are going to work with, we register jsx.
3: Syntax Highlighter receives two properties, the language to highlight and the style, we will receive these properties from our <Post/>component together with the code block that we will pass as children.
4: Copy To Clipboard will help us to copy the content of the code in the clipboard, this component receives a property called textthat is what we want to copy. We will pass the children’s property that we passed to Syntax Highlighter.
5: How to Copy To Clipboard commonly is an icon we will do it in the same way, an icon which serves to copy and once copied the text we will show the icon of Pay for 1000 ms. There are several ways to tell the user that the text has been copied, such as a toast message, an alert, etc.
6: The last functionality that we want to add to our <Code/>component is to be able to choose between a dark or light theme. We will do this simply with the icons that are usually used in these cases, a sun icon and a moon icon. This button will do is to change the state that we have at the moment by its opposite to show the corresponding style.
Code.js :
import { useState } from "react"
import { CopyToClipboard } from "react-copy-to-clipboard"
import { PrismLight as SyntaxHighlighter } from 'react-syntax-highlighter'
import jsx from 'react-syntax-highlighter/dist/esm/languages/prism/jsx'
import { materialDark, materialLight } from 'react-syntax-highlighter/dist/esm/styles/prism'

import { CopyIcon, PasteIcon, SunIcon, MoonIcon } from "../assets/icons"
import '../styles/Code.css'

const Code = ({ children, language, isDark, setIsDark }) => {
  const [isCopied, setIsCopied] = useState(false)

  SyntaxHighlighter.registerLanguage('jsx', jsx);

  const setCopied = () => {
    setIsCopied(true)
    setTimeout(() => { setIsCopied(false) }, 1000);
  }

  return (
    <div className="code">
      <div className="code__icons">
        <button onClick={() => setIsDark(!isDark)}>
          {isDark ? <MoonIcon /> : <SunIcon />}
        </button>

        <CopyToClipboard text={children}>
          <button onClick={() => setCopied()}>
            {isCopied
              ? <span title="Copied!"><PasteIcon /></span>
              : <span title="Copy to Clipboard"><CopyIcon /></span>
            }
          </button>
        </CopyToClipboard>
      </div>

      <SyntaxHighlighter language={language} style={isDark ? materialDark : materialLight}>
        {children}
      </SyntaxHighlighter>
    </div>
  )
}

export default Code
Last steps
We already have our main components ready, <Post/> and <Code/>, now all we need to do is to integrate them where we want for our blog. For this simple exercise, I have only taken the main component <App/>as if it were a page of our blog. You can create the structure that suits you for your project and your own style.
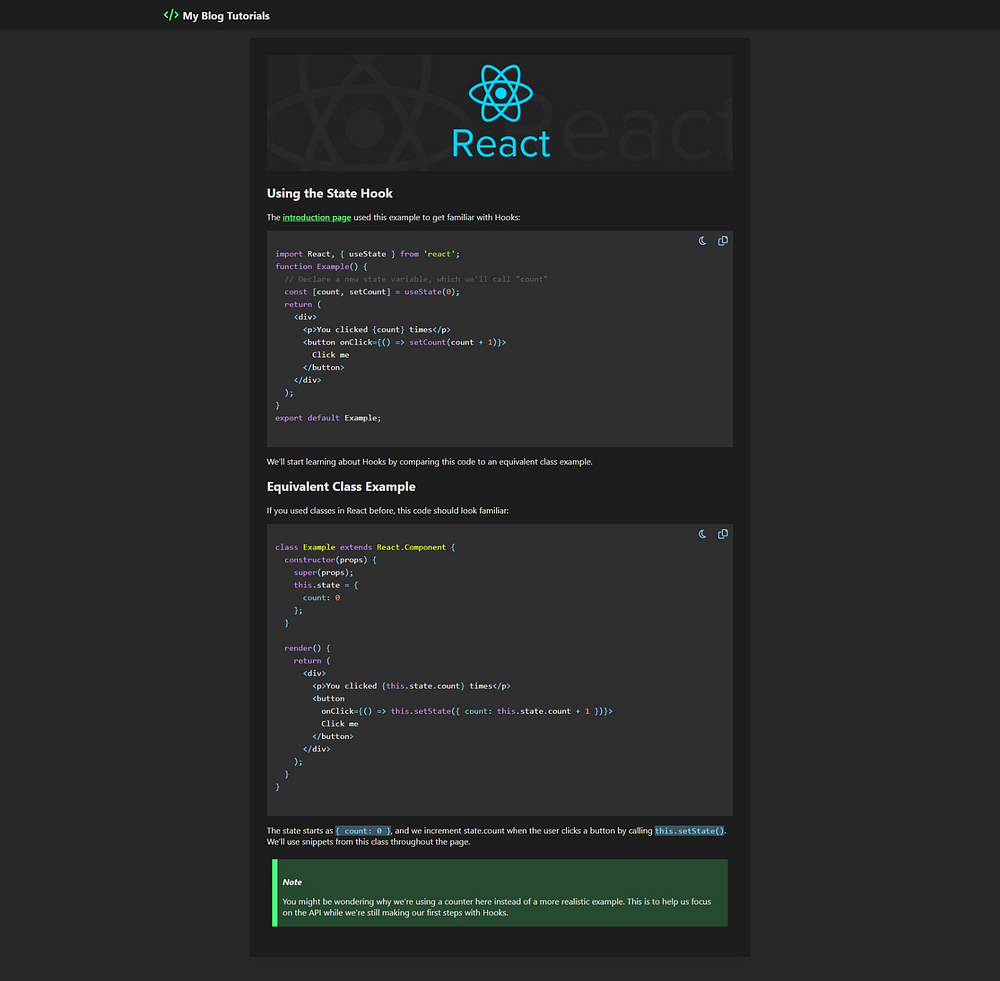
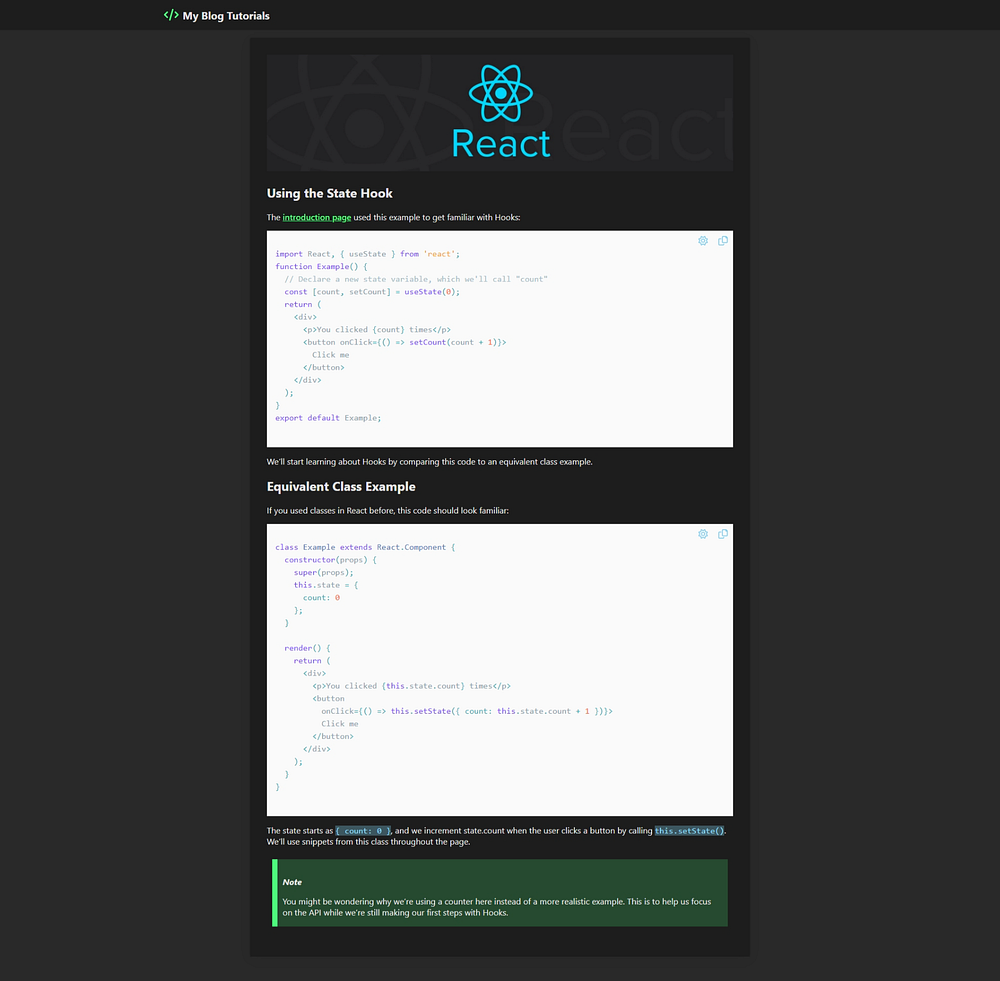
This is what our blog looks like:
Dark mode:
Light mode:
Conclusion
In this tutorial, we have seen how easy it is to work with Markdown files inside React and use what we could give when using Markdown to write a blog.
But we could take one more advantage of Markdown because being a language in which we don’t necessarily need to write code but just text these files could be written by people who are not programmers.
I hope this tutorial has been useful and that you can use what you have learned in your next projects.
Want to Connect with the Author?
Love connecting with friends all around the world on Twitter.